


Crafting Delight: 3D Gingerbread House Tutorial with Free SVG File for Cricut
Welcome, crafters, to a festive journey of creativity! In this tutorial, I'll guide you through the delightful process of crafting your very own 3D gingerbread house using your trusty Cricut machine. The best part? I've got a free SVG file waiting for you to download, making this project not only fun but also budget-friendly.
Mobile users turn your phone or watch the YouTube video here.
Getting Started
Before we dive into the crafting magic, make sure you have your Cricut machine ready to roll and download my exclusive gingerbread house SVG file under the community SVG files here. You can learn how to download here for desktop and here for iPad/iPhone. Please remember to sign up for my newsletter below to grab the password to the vault. Once you've got everything in place, let's embark on a whimsical journey of paper crafting.
Materials You'll Need:
*This blog post may contain affiliate links that help me earn a commission at no extra charge to you, please see my full disclosure here*
- A Cricut machine or similar - I am using my maker and a 12x12 mat to cut everything out
- 12 x 12 cardstock or adjust your sizing! I am using 80 lb cardstock in brown and white, but I always love to leave colors up to you. For all the glitter cardstock I always recommend Celebration Warehouse!
- Acetate Sheets - these are optional for inside the windows
- Craft glue - I am using Bearly Arts
- Hot Glue gun and sticks!
- A bone tool - optional for folding
- Tweezers - optional for helping place small pieces or you can use a QuikStik
Cricut Design Space Set Up

To start, I always say to resize first. I used 12x12 paper so my max on each piece is 11.5x.11.5. I resized to 32.5 inches to get close to that max but you can resize however you would like. Make sure to resize the whole file.

Next, ungroup the file then adjust all the lines that are grouped with the panels to score lines and attach. If you don't have a scoring stylus or wheel you can delete these. Make sure to attach the score lines back onto the piece it is grouped with.

Finally, go around and change any colors you see fit! I cut my file out with the medium cardstock setting and acetate setting.
Assembling the 3D Gingerbread House SVG
Once your Cricut finishes cutting, carefully remove the pieces. Now comes the fun part – assembling your 3D gingerbread house. You can watch and craft along with the YouTube video above or follow these steps:
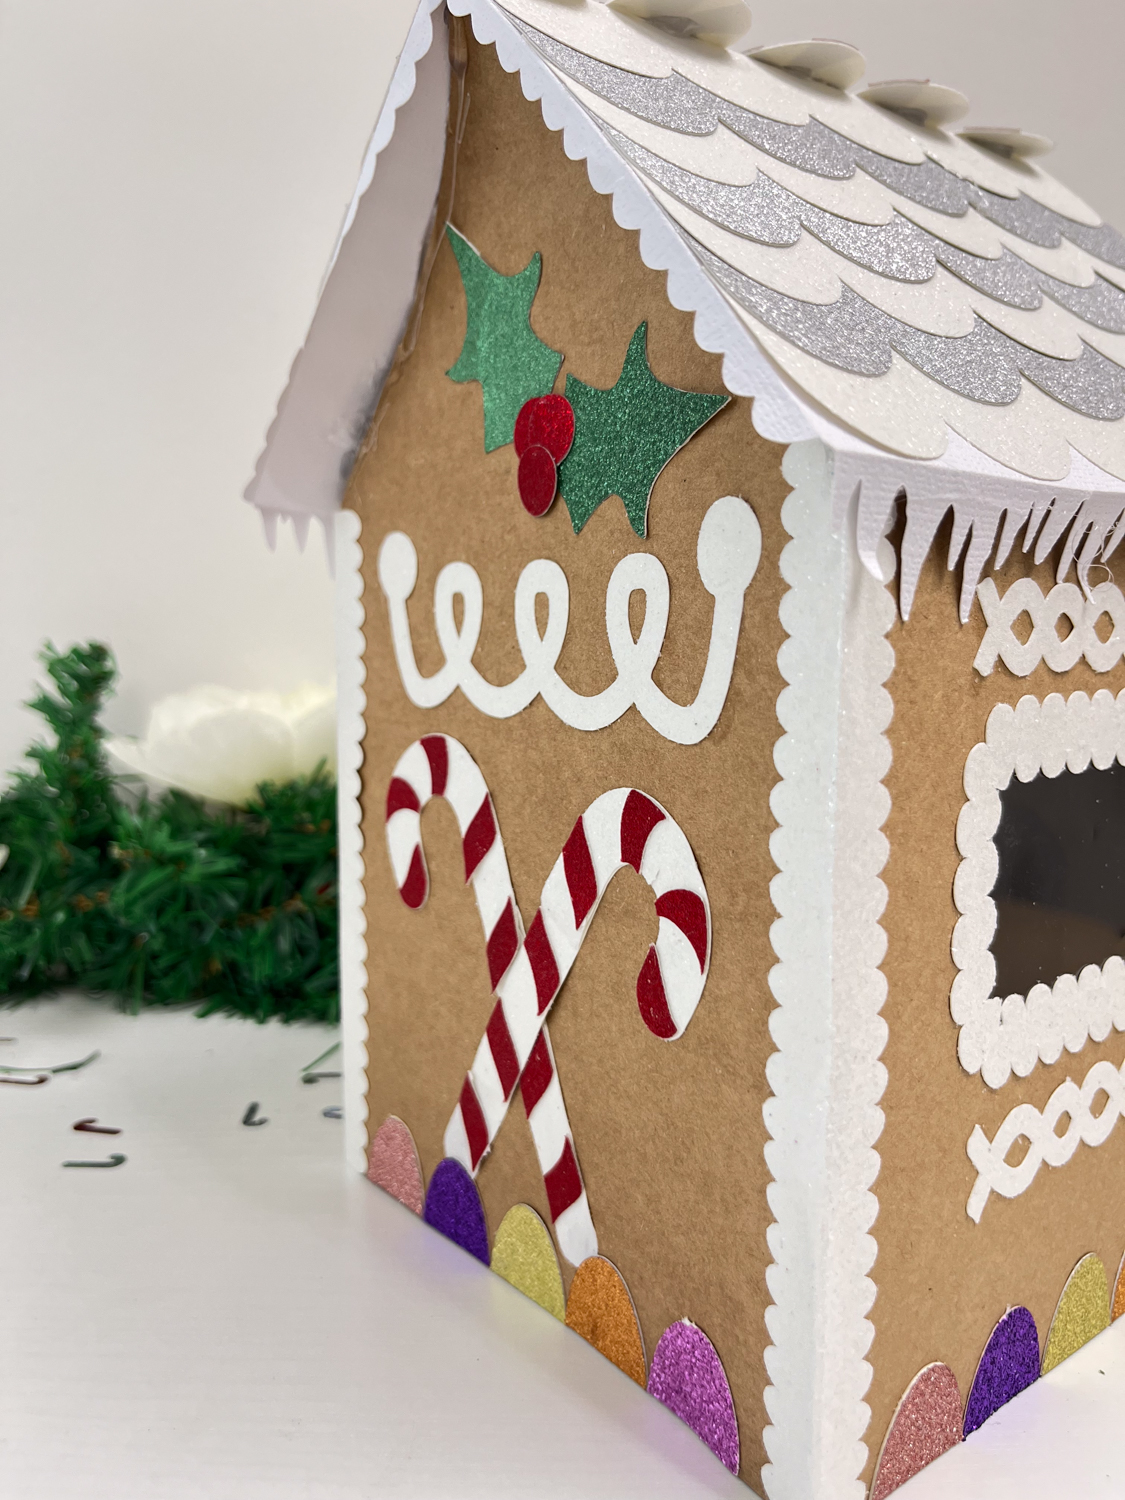
Step 1: Assemble The Detail Pieces

I started with my candy canes then moved on to my gingerbread man and peppermints.

I suggest doing all these detail pieces first to keep any small bits from wandering off.
Step 2: Assemble the Front Panel

Since all your details are done, you can start adding them to the house panels

The door has an "icing" boarder and small door handle. I glued one side down to the house so it flaps open.

Then I added all my detail pieces - my suggestion is to refer back to the SVG file to see where to place everything.
Step 3: Assemble the Window Sides

The acetate panels should be placed on the side. You can place this first then flip back over to add all the decor parts.

For the gumdrops, I used the "icing" columns as a guide to keep them in between but you can place however your heart sees fit. For the "icing" columns on the corners, I placed this on after I had made the gingerbread house 3D.

Step 4: Assemble the Back
Remember to do all the detail work on the correct side - look at my mess up... you want to make sure when you assemble, all the details will be on the outside.

Again, like the front and sides, you can refer back to Cricut design space to look at the original SVG and see where places should be placed. You also can do whatever you want with the file! decorate and change colors are you see fit!! I also placed the candy canes behind the gumdrops on this panel.

Step 5: Assemble the Roof
There are 7 panels of scalloped shingles for each side. I made mine two toned but you can layer however you would like.

To line up the panels, keep them in between the score lines and work from the outside to the middle of the roof.

You can fold on the score lines after you have all 14 panels glued on!
Step 6: Make the Gingerbread House Complete

Let's make this 3D! Start by folding on the score lines of the house and glue the flaps on the inside of the opposite panel.

Once the box part of the house is made you can fold the columns and glue these onto the corners. They are all the same size so don't worry about which one goes where.

Add the roof on with a thin layer of hot glue, it has extra room for hanging off the front and the back.

Hot glue on the peppermints to the roof, there are five peppermints and five scalloped edges to place everything evenly.

Finally, place your gingerbread man on your house!

Tips for a Perfect Craft:
- Use a variety of gingerbread-colored cardstock for a vibrant and realistic look.
- Don't rush – take your time assembling each piece for precision. We saw what happened with me and the wrong side on the house panel!!
- Add personal touches with embellishments like glitter or tiny decorations for that extra holiday sparkle.
Congratulations, crafters! You've just crafted a charming 3D gingerbread house using our free SVG file and your Cricut machine. We hope this project adds a sprinkle of joy to your holiday season and inspires you to explore the endless possibilities of paper crafting.
Ready to start? Download your free gingerbread house SVG file now and let the crafting festivities begin! Don't forget to share your creations with me on social media!


.webp)