Let’s work step by step together to create some beautiful and unique DIY cake toppers with our cutting machines.

I will being using Cricut Design Space to create our layers today but the same practices can e used in Silhouette studio for your own cake toppers and designs!
Types of Cake Toppers to Make
These days I feel like we have more celebrations than ever which means we can make a cake topper for each holiday and party! Here are some general themes to work with that you can create cake toppers for personal use or even to sell!
- Birthday Party Cake Toppers
- Baby Shower Toppers
- Holidays (Valentine’s Day, St Patricks Day, Fourth of July etc)
- Anniversary Toppers
- End-of-School Toppers
- Graduation Toppers
- Retirement Toppers
- New Job or Promotion Toppers
- New Home Topper
- Wedding Cake Toppers

And on top of having general broad themes like above you can niche down in terms of colors or party for example mermaid cake topper or cartoon characters like Spider-man!
From there you have to think of the type of topper when it comes to design - right now shaker cake toppers are huge. A shaker cake topper has multiple layers including a foam layer and acetate layer where you fill it with miscellaneous items like sequins or confetti. You can also stay simple with single layer typographic cake toppers, if you’re new to Cricut crafting then this might be a great place to start. Master one layer then begin to add on a new layer as you feel more comfortable.
Materials and Tools Needed for Cake Toppers
Let's start with machines, what is nice is you can make custom cake toppers with almost any Cricut machine. Now, the material you use will make a difference in the machine needed. If you are sticking to card stock cake toppers then you can use everything from a Cricut Joy to a Cricut Maker. For basic toppers, you will only need the fine point blade. However, if you want. to cut something like the Cricut chipboard than you are going to be limited to the maker because you will need the knife blade.
If you are looking to make an acrylic cake topper than you will have to opt for a laser, although a Cricut can engrave on some acrylic, overall this machine isn't going to do it! It would help if you had something more powerful
Here is a general list of the different materials you might use for your own DIY cake topper:
- Card stock paper - I love to use 65-80 lb cardstock for these, anything from textured cardstock to glitter cardstock to patterned paper. If you are creating layers this is a great way to have pops of color and stick to your theme.
- A good tacky glue - now I tend to use Bearly Art glue for a lot of my crafting but you can also opt for a hot glue gun and a glue stick which you will probably end up using to attach your cake topper stick to the back of the topper.
- Cake topper sticks - you can use acrylic sticks, bamboo skewers, wooden dowels, or even paper straws to hold up your cake topper in the top of a cake.
- Adhesive vinyl - this is always good for thin fonts or accents or you can opt for heat transfer vinyl for some parts. Don't forget transfer tape if you are using adhesive vinyl!
- If you are making a shaker cake topper you will need foam tape or sheets, acetate sheets, and of course things to fill in the shaker.
- A printer - a lot of these fancy Cricut cake toppers utilize the print then cut feature, so a good printer and photo paper is a must.
- Cricut mats - I tend to always use the standard grip mat but you can also opt for the light grip as well!
How to Make a Layered Cake Topper

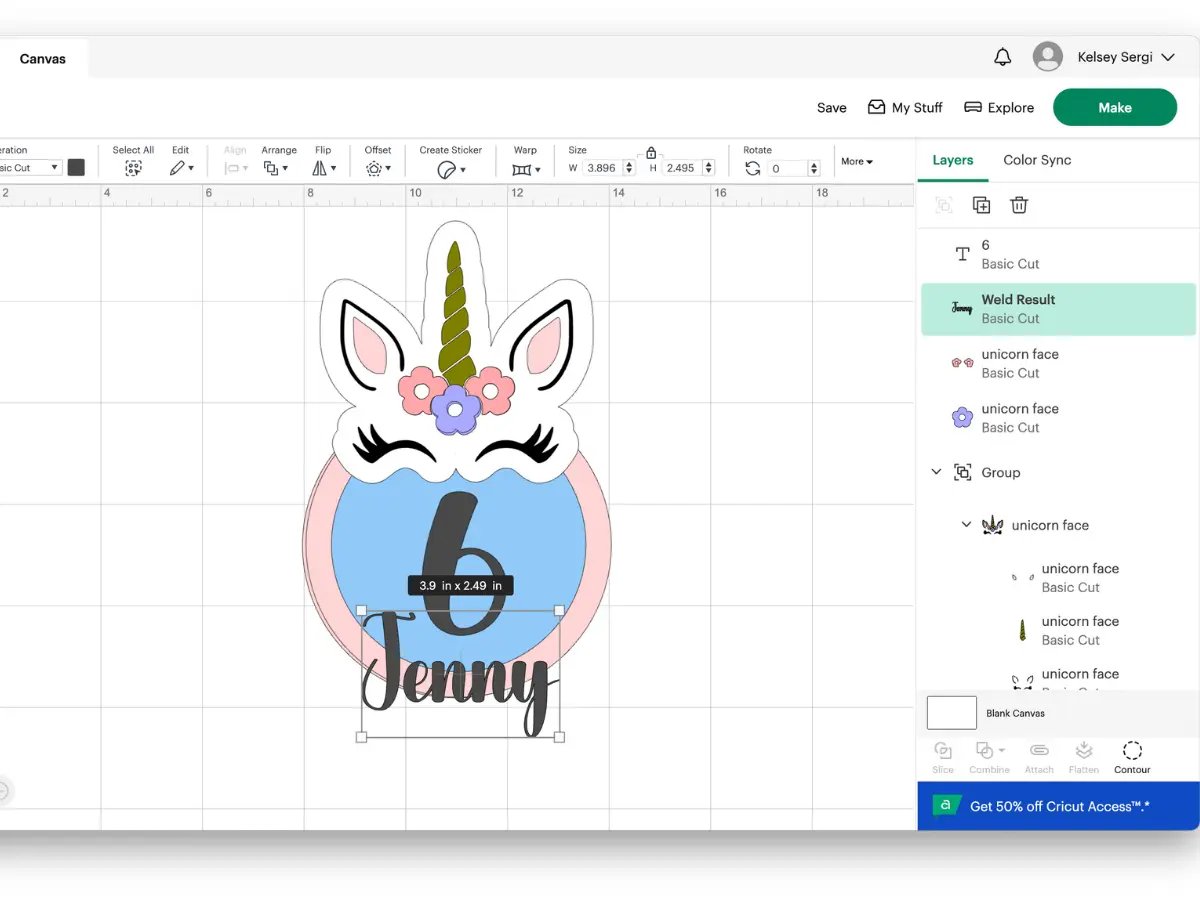
For this DIY cake topper tutorial I am going to make a happy birthday shaker topper with a unicorn theme. We will create some layers using the offset feature and make a fun an adorable personalized cake topper. As we work through this file, I will be changing all the different parts to match the colors I will be using, this will also help you need all the offset layer pieces and give a 3-D effect while still in digital form.
Step 1: Finding the Right Font
I love to use Creative Fabrica for my fonts but you can also utilize so many websites to download free fonts from. I am going to go with a thick font that has a bit of whimsy to it (we are making a unicorn cake topper here). Make sure to download your font before opening Cricut Design Space so that it shows up in your system fonts.
Step 2: Upload Your SVG File (or files)
I have created a few shaker cake topper files in my community SVG files for you to work off of or you can build from scratch like I will show you. You can find full download instructions for Chrome desktop here and Safari/iPad/iPhone here. Check out my kids/toddler SVG files for the unicorn file and for even more free downloads, sign up for my newsletter below for the password to the community files.
To upload new files, click upload on the side panel, then locate your file that you downloaded. Follow the prompts and add to your canvas.
Step 3: Create the Cake Topper Layers
Its a good idea to start with front of your topper and end with the back layer but there are many different ways to create many different cake topper designs. So, go with your own flow and have a lot of fun doing it!

I have added in my unicorn file and now I am going to make my layers behind it. You can double your main SVG (here being the unicorn horn and eyes) or you can leave this as one layer. From there I am going to create an offset of the whole unicorn file so I have something to build the face on and it creates an even backing for me to build off of. Creating layers for cake toppers is what makes them so incredible.
Step 4: Create the Base
I am going to make a circular shaped shaker cake topper but you can use this technique with any shape. Since we are making a shaker we will need to create a minimum of three layers (if you are using foam tape) and four layers if you want your Cricut to cut a foam sheet.

Make your back piece and keep in mind the size of your cake - if you have a small cake you are not going to want a 10 inch cake topper. I would size an 8 inch cake with a 6-7 inch topper. Remember also to keep in mind weight and height, this will prevent the topper from falling over or sinking down into the cake too much.

Now, we are going to create our layers with the offset tool. I first start by doubling the backing then creating an inset, hit apply. You want to have a slightly smaller piece for your acetate plastic piece I made mine blue, shown below.

Next, take the smaller inset from the blue acetate piece, hit apply again. With the new small inset circle and one of the doubled backing pieces, either slice and delete the pieces on the inside, just leaving a ring or use the subtraction tool. This ring is going to cover our foam piece.

If you are creating the foam ring from foam sheets create another inset of just the ring piece. I usually duplicate this before cutting since my foam sheets tend to be on the thinner side. Double check if making the foam ring that the acetate will lay nicely on it, the acetate circle should be larger than the foam but smaller than the cover up ring.


Step 5: Add Your Text
I am going to use the font I downloaded to create a number for the birthday and the name. You can utilize text to create anything you want, even a simple happy birthday!
For both of these I want to create layers, again these cake toppers are all about layers. This way you can utilize different color cardstock and add a lot of dimension. For the top layers, rather than using pieces of cardstock, this is a great place to opt for your adhesive vinyl. When I have thin fonts or a lot of pieces I love to use vinyl (or you can use the smart sticker paper) because it is the easiest way to keep things together. I ended up using vinyl for my eye lashes and my ear outlines!

Cut Settings
Once you have your layers set up and all your colors ready to go, you can begin to cut out your pieces. For settings, I always suggest testing out your materials before you cut a ton of it. This way if there are any cut issues, you aren't wasting anything. For cardstock I almost always use the Medium Cardstock setting on fast mode (fast mode is available on the Cricut Maker and Cricut Explore Air 2).
If you are cutting acetate sheets I use the acetate setting on my maker or the transparency setting on my Air and I cut twice. For the foam sheets if you are cutting them I tend to use the craft foam setting and I change the blade from the deep point blade to the fine point blade.
Cake Topper Assembly
Whats great about any Cricut craft is a lot of the time you will just look back at Design Space and put everything back together like a puzzle.

I start with my back and glue down my foam piece or add my foam tape around the edge like a boarder. Then I fill up with lots of sequins, glitter, and confetti.

Next, glue on your acetate or tape it down on top. Some people like to wipe this down with alcohol before placing to remove any smudges.

Finally, top with the ring cut out to hide that foam layer, it's like a cover up to hide any non-pretty pieces.

Now we add on our detail layers. You can build your pieces first (i.e. the name layers) and then add them onto the topper. I like to use foam tape for these as much as I can again to add a lot of definition and depth.


You can use either craft glue or hot glue to attach on your detail pieces and don't forget to refer back to your image in Cricut Design Space as a guide. Then you can hot glue your cake stick to the back, I like to go relatively far up the back of the topper to avoid sagging.

As you get more comfortable with creating these layers you can start to play around with different heights for different components. For example on my Spider Man cake topper I used different amounts of the print and cut cityscape to create depth to it. I also added Spiderman to a piece of fishing line and some magnets so he could swing from building to building!

Cake toppers are so much fun to cake and create and truly they bring endless creative potential. The party decor business is an exciting one to be a part of and it can truly open up your creativity to levels you never imagined. I always like to say, start small, do not compare yourself to the crafters you see online because everyone started as a beginner. Crafting is an endless growing and learning experience that is different for every single person who does it.