

A Perfect Adult Valentine Craft & on a Budget: an Upcycled DIY Vase
Spring doesn't have to wait for its official entrance to bring a burst of floral joy into your living space. As we embrace the new year, there's a perfect opportunity to dive into a budget-friendly and environmentally conscious Valentine's Day craft. In the spirit of resourcefulness, I've made it my goal to repurpose what's already at home instead of splurging on new craft supplies. This not only aligns with my commitment to sustainability but also adds a layer of personalization to the project.

The beauty of this adult Valentine craft lies in its adaptability. Feel free to pick any bottle you have on hand, giving you the creative freedom to match the decor style of your home effortlessly. And for those who appreciate the rustic charm of farmhouse aesthetics, infusing a farmhouse vibe into this DIY vase is a breeze.
Let this project be a testament to the idea that crafting doesn't need to break the bank. Instead, it can be a celebration of creativity, ingenuity, and the joy of transforming the ordinary into the extraordinary. So, gather those bottles, embrace the farmhouse flair, and let's embark on a crafting adventure that's not only budget-friendly but also a delightful expression of love and sustainability. Cheers to a perfect adult Valentine craft that's as unique as your love story!
*some links may contain an affiliate commission when clicked at no extra charge to you - read my full disclosure.
Mobile users turn your phone or watch the YouTube video here.
Materials You'll Need for Your Upcycled Valentine's Day Vase
- I am using an empty bottle of in wash scenet booster beads - the ones from Sam's club. These are a large size but really any sort of cylinder will do.
- Mod Podge - You can use the matte or glossy, mine is glossy and I wish I would have used this at the end to seal in the paint (I guess I still can right?)
- Scissors or an exacto or both!
- Sand paper - this is just to get rid of small nicks in the plastic.
- Paint - I am using Dollar Tree Acrylic paint but you can use what you have and in whatever color. I went for a more farm house look but for Valentine's Day you can do red, pink, or go dark with black.
- Paint brushes for both the Mod Podge and paint
- Twine - You can use any kind of ribbon or twine.
- Hot glue and gun - This is to attach on the twine or ribbon to the top.
Download Cricut or Silhouette free Valentine's Day SVG files for your crafts during this season!
For access to my community vault of projects and files, sign up for my newsletter below.
Step-by-Step Guide to Transforming Your Bottle into a Vase

Step 1: Remove the bottle wrapper and mark the vase with a marker - I did this a little backwards. You can cut the top without marking but by adding water into the bottle and marking around the top before cutting will help for an even cut.

Step 2: Make the top even, if marking didn't work, you can take your scissors and cut down towards that line you marked and create small marks so you can then cut around the boarder to make it extra even.


Step 3: Sand down any nicks and cut them off, don't worry about perfection here just aim to get rid of being pieces. We will cover up a lot of the top with twine/ribbon.

Step 4: Dry off the vase and Mod Podge the outside. This will help prep the plastic for painting. Allow this to fully dry.

Step 5: Paint - I did two coats. Allow drying in between. You can mix colors and make it your own. I kind of wish I had added some metallic gold lines. But maybe this just means I need to make another upcycled vase.

Step 6: This is the step I skipped.... but you should definitely put a layer to seal in the paint, either a spray or even more Mod Podge.
Here's the step I skipped (oops), but you definitely shouldn't! Sealing in the paint is crucial for preserving your masterpiece. Whether you opt for a spray sealant or another layer of Mod Podge, this step ensures the longevity of your upcycled creation. A glossy finish, in particular, can add a professional touch, enhancing the overall aesthetic.
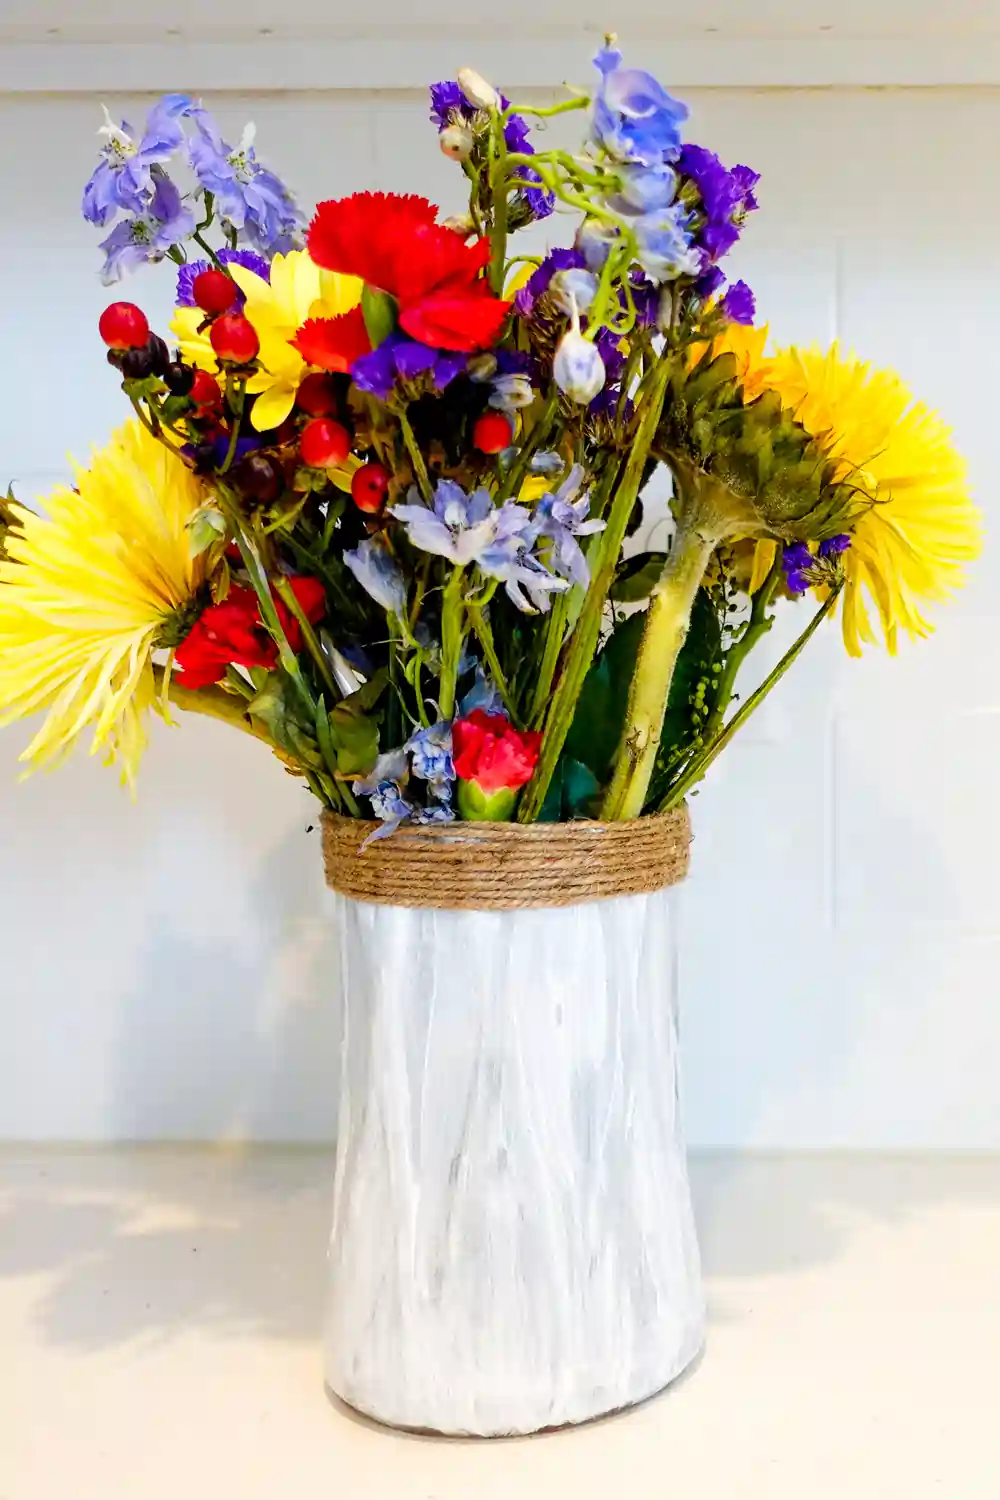
Step 7: Twine at the top. Using your hot glue, wrap the top with twine or with ribbon to cover up any edges and add some color or a farmhouse vibe (twine is my go to for that). Make sure to do a layer along the top.

Step 8: Add in your flowers! Add some water, some beautiful flowers (Spring can get here soon enough), and share them with your Valentine.

Whether it's vibrant blooms, romantic roses, or a combination that screams your unique love story, adding a touch of nature elevates your creation to the next level. Share this bouquet with your Valentine, and voila – your sustainable romance has blossomed into a beautiful, tangible expression of your love.
Sustainable Romance: Why Upcycling Makes Your Valentine's Day Extra Special
A Valentine's Day celebration that's not just about love but also about turning everyday items into extraordinary expressions of your unique bond. In the grand finale of our upcycled love affair, our humble bottle has transformed into a vase, symbolizing the evolution and endless possibilities of your relationship.
Beyond the eco-friendly high-fives, upcycling became the glue that held you and your sweetheart together in a fun and creative adventure. The shared laughter, the teamwork, and the joy of crafting your own love story in the form of a funky vase – it all adds up to a Valentine's Day like no other.
Your upcycled creation isn't just a piece of decor; it's a masterpiece, shouting, "We did this together, and our love is as unique as this funky creation!" With each brushstroke and embellishment, you've added another chapter to your shared journey. It's not just a vase; it's a symbol of your love's quirkiness and the magic that happens when you put your hearts and hands to work.
As we wrap up this sustainable romance, remember that your upcycled masterpiece isn't just a Valentine's Day accessory; it's a high-five to the planet and a declaration of your commitment to love, creativity, and a little bit of quirkiness. This Valentine's Day, the memories you've created are as sparkly and vibrant as your upcycled vase, proving that love can be fun, green, and uniquely yours. Here's to turning trash into a treasure trove of love and making every day as special as your upcycled creation. Cheers to love, laughter, and a little DIY magic!


.webp)