

Are you ready to take your Halloween party to the next level? Forget about generic store-bought party favors—this year, it's all about creating DIY Halloween party favors that truly reflect my creativity and personal style.
And the best tool to bring my creative vision to life? Cricut! In this guide, I'll show you how to use Cricut to craft stunning 3D Witches Hat Boxes (with a free SVG File) that will add an extra touch of magic and charm to my spooky celebration.
Get ready to impress your guests with unique and memorable Halloween party favors that they'll be talking about long after the night is over. Let's fire up that Cricut machine and conjure up some DIY magic!
*This blog post contains affiliate links that may help earn me a small commission at no extra charge to you*
Mobile users turn your phone or watch the YouTube video here.
Materials and Tools Needed:
To get started on your 3D Witches Hat Box, you'll need to gather a few materials. Here's a list of what you'll need:
- Cricut machine or Silhouette: Make sure your machine is in good working condition and connected to your computer.
- Cardstock: Choose a sturdy cardstock in the colors of your choice. I used an 80 lb weight and textured! I also used glitter paper in black and goil foil.
- Adhesive: I use both craft glue and hot glue.
- Scissors or a cutting tool: this is only for the twine! My preferred scissors are non-stick which you can find here.
- Twine or any kind of brown string: This is to make your broom decor
- Acetate Sheets: this is for the shaker portion
- Sequins or confetti: for inside your shaker. I used green and black but colors are always up to you!
- Foam sheets or foam tape: if your machine can cut foam sheets, this is what I used!
- Heat Transfer Vinyl: I am using this for the potion bottle and it is optional you can use paper (which will be tiny pieces) or regular vinyl.
Downloading the New 3D Witches Hat SVG File
This free SVG download will be in my community vault under halloween. Keep in mind there is one labeled 2023 ROUND and that is this box! You can find the instructions here for my original witches hat box which is labeled 2022 SQUARE - you can learn how to download here for desktop and here for iPad/iPhone. Please remember to sign up for my newsletter below to grab the password to the vault.
Preparing the File for Cutting in Cricut Design Space
This file only needs to be resized and colors changed - there should be nothing else done for editing. If you resize please remember to resize the whole file so that everything is correct when assembling. I resized my file to max out a 12x12 piece of paper with a width of 24.54 inches.

Two colors to keep an eye on in the layers: the light blue is the acetate layer and the bright fuchsia purple color is the foam layer. Please delete or modify as necessary.
Assembling your DIY Halloween Party Favor Boxes
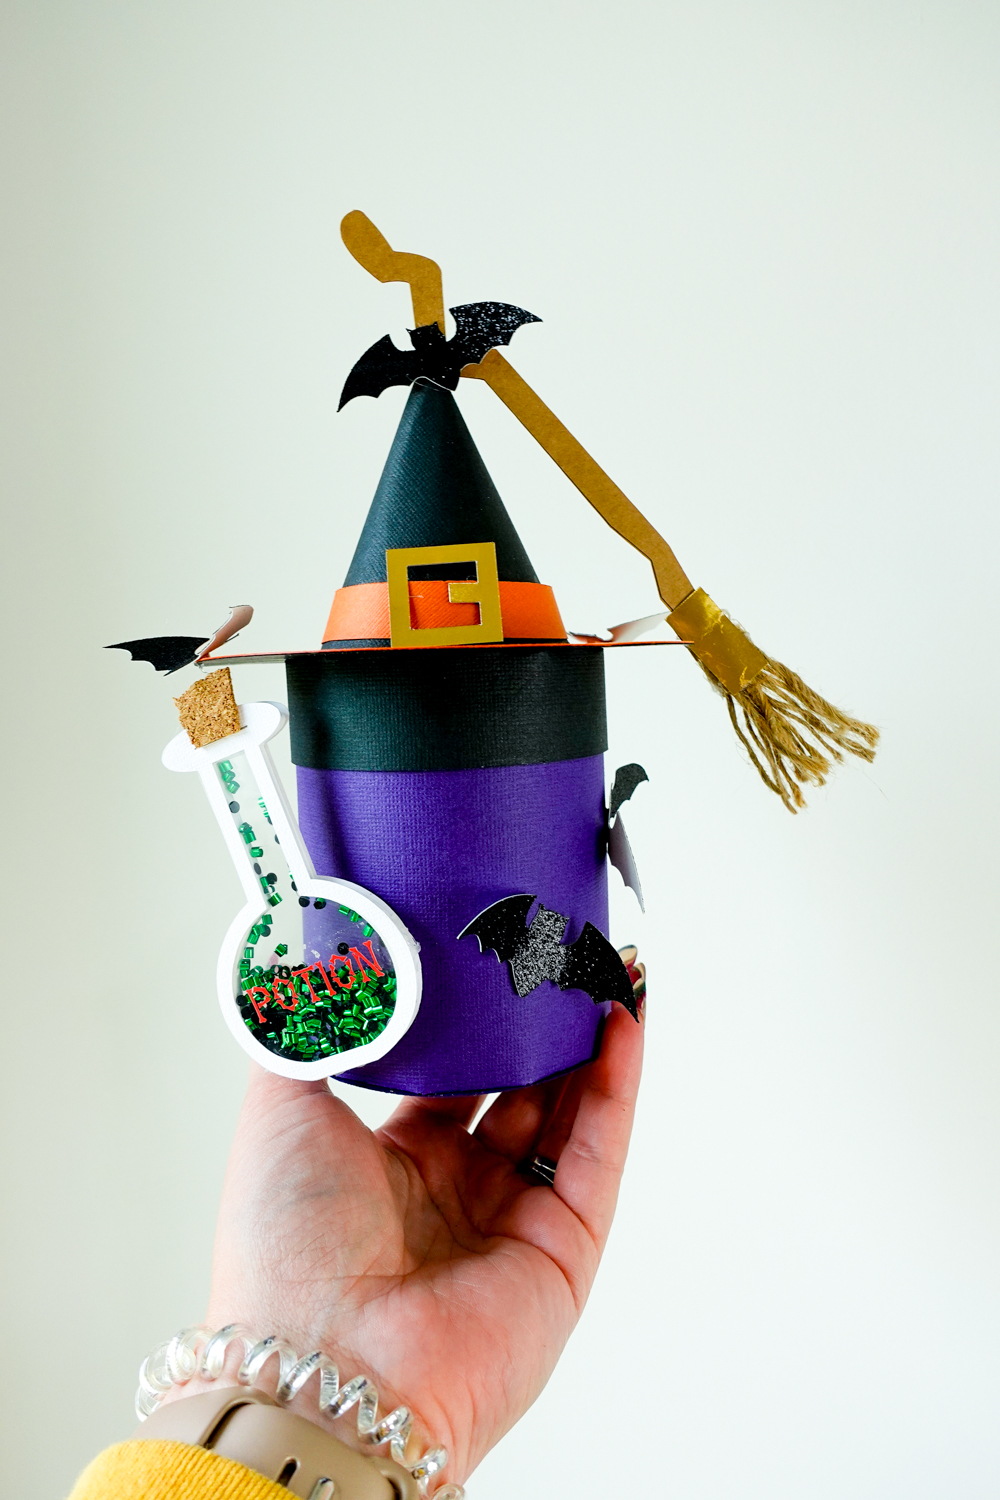
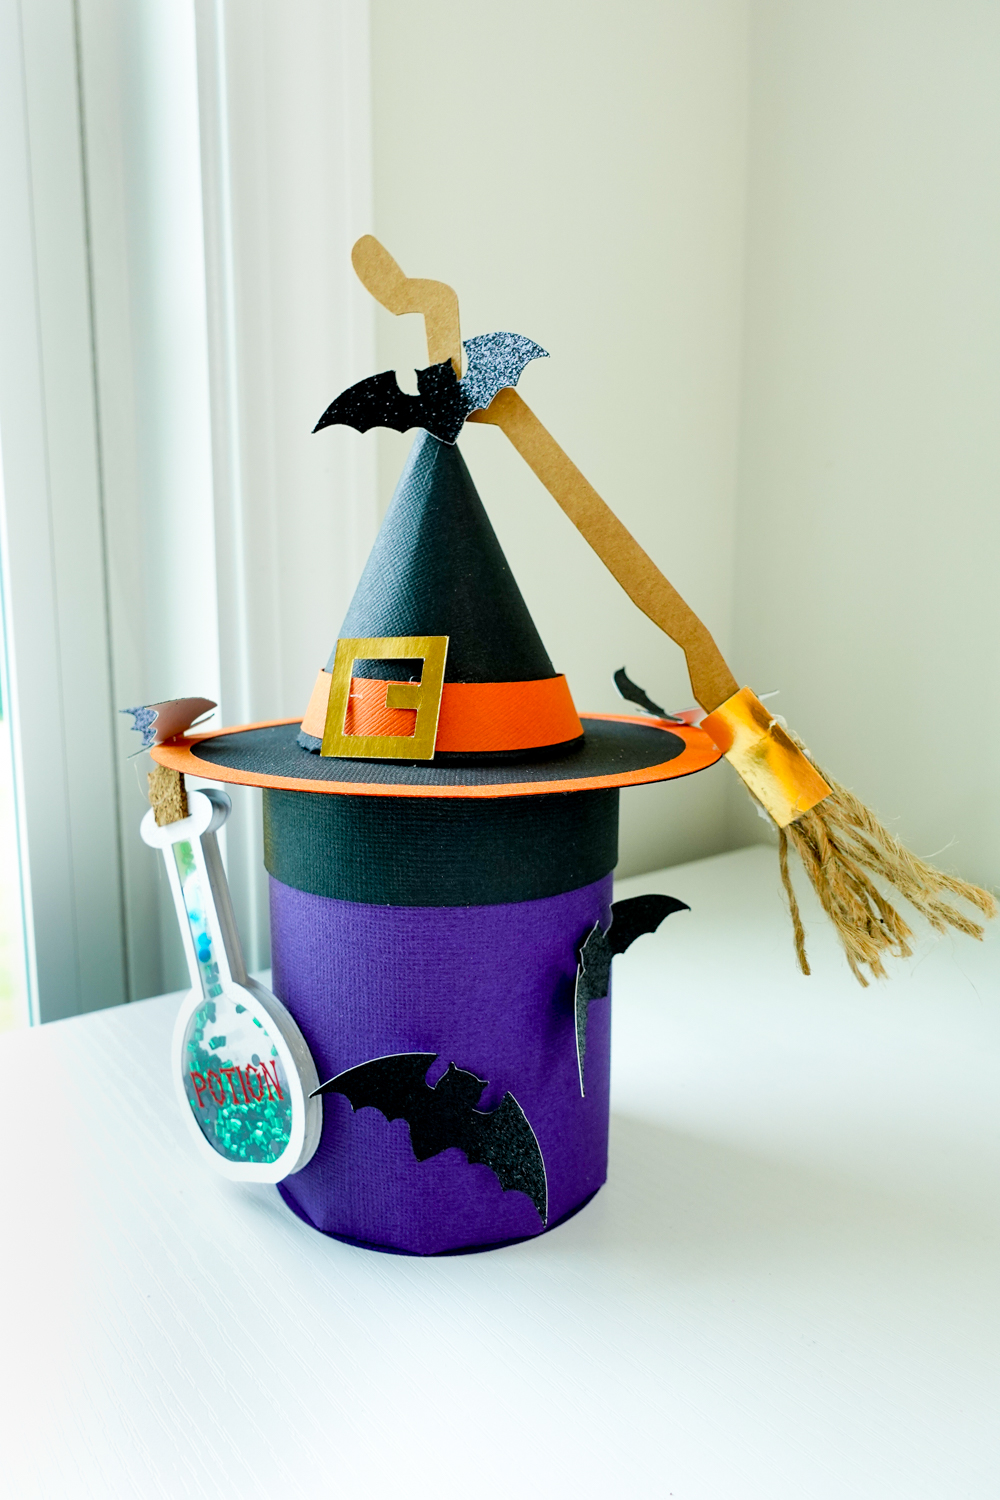
Step 1: Make the round boxes (this is similar to my free lipstick box) - you will fold in on the tabs, roll the paper and glue on the flap, make sure the sides are even. Then insert the smaller circle inside to keep the cylinder shape and place the larger circle on the outside sandwiching the tabs.

Step 2: For the top of the box the hat will have a wide brim and you will roll the cone up, keeping it as tight as possible. Fold in well on the tabs on the bottom. Glue this to the lid in the center.


Step 3: Add the details to the hat - the belt and buckle around the cone and the ring around the brim.

Step 4: Build the potion bottler shaker - the layers should be paper outline, acetate, foam layers, place the sequins/confetti inside, then top with the other acetate and the paper.

I used hot glue and craft clue to assemble the layers. Remember to place your potion label on the acetate layer - I used my mini easy press for 10 seconds on the lowest setting.

Step 5: Assemble the broom, you will need twine here around 1.5-2 inches (depending on how big your cuts are). Hot glue these onto the bottom of the broom and sandwich them between the paper. You want this to be two sided.


Step 6: Add the decor pieces to the witches hat box.
I placed the assembled broom onto the hat with a little hot glue.

I placed the shaker onto the side of the box base with hot glue. I did this on an angle so it was secure. Make sure to not glue it to the lid and base.

The bats can be folded up on the wings and placed all over the hat and box base with hot glue.
Step 7: Add personalized name tags if you want! I love the font Halloween from Creative Fabrica - grab a free trial for them here!
Conclusion and More Free Halloween Projects!
As the Halloween party approaches, I can't help but feel a surge of excitement and satisfaction knowing that I've created my own DIY Halloween party favors with the help of Cricut. These personalized 3D Witches Hat Boxes have added a touch of enchantment and creativity to my celebration, making it truly memorable for both myself and my guests.
I hope this guide has inspired you to embark on your own DIY adventure and unleash your creativity this Halloween. Remember, with Cricut by your side, the possibilities are endless. So gather your materials, fire up that Cricut machine, and let your imagination run wild. Your party favors will be a reflection of your personal style and a testament to your crafting prowess.
Grab some more free halloween SVG files here or learn how to make some halloween goodie bags here!


.webp)
