


Fall is upon us, so let's make some easy DIY Fall Centerpieces.
These paper pumpkin centerpieces are quick to assemble and can be a fun craft-a-long with your kids! These DIY Fall Centerpieces are great for your kitchen island, tv stand, classroom or bookshelf!
You can download the free SVG template here - note these are on my Community Member SVG page so you will need to sign up for my newsletter for the password. You can sign up at the bottom of this post if you haven't already joined the fmaily!
*Some links may help earn me a small commission at not extra cost to you*
Materials to Make the DIY Fall Centerpieces
I love this project even more because the materials and tools list is so small! For these paper pumpkins you will need:
- Cricut or other cutting machine: I am using my Cricut Explore Air 2
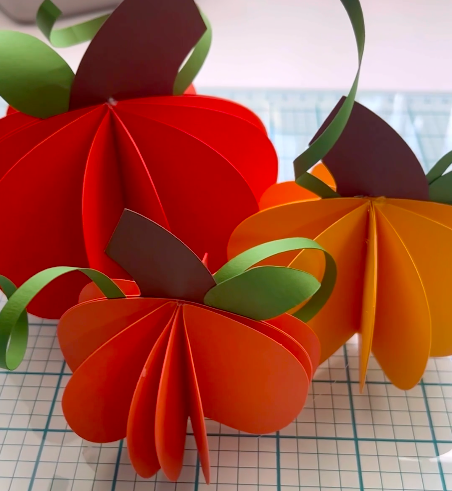
- Cardstock paper - I am using a mix of 65 pound (175 gsm) to 80 pound (215 gsm) in orange, brown, and green. I love Printworks DIY.
- Craft Glue - I am using Bearly Arts precision glue and code DINOMAMA saves you 10%
- Hot Glue & Sticks - I am using a Surebonder cordless glue gun
- Optional: Bone tool for curling but you can also just use a popsicle stick or scissors.
Setting Up Cricut Design Space
Again, these are super easy, after you have downloaded the free SVG template - you can upload and resize in Cricut Design Space. Remember one piece of the pumpkin is going to be the diameter. I made three different sizes ranging from 3 inches to 4.5 inches. Make sure to size before you ungroup the image. That way you know all the pieces like the stem and leaf are resized properly as well.

Then you can ungroup and change the lines you see down the middle of some of the pumpkins to score lines. From there remember to attach them back to the proper piece using the paper clip in the bottom right side.
Note: if you don't have a scoring stylus or scoring wheel, no problem, you can just delete these lines and will fold by hand.
Once they are attached back on you can send to your machine to cut. I use the medium cardstock setting and I like to go on fast mode for these projects! I love fast mode, but if your projects have a lot of intricate bits, be careful using this setting.
Assembly of Our DIY Fall Centerpieces: Building Our Pumpkins

Time to make our centerpieces, I started by folding on my score lines. I have no reason to start here, I honestly think it's out of habit now to start there. I like to know that the pieces are prepped and ready for assembly. I used my scoring stylus for these and it makes a decent line, you can also use the scoring wheel and if you don't have any of these, don't worry, just fold in half by hand!

Then I glued my two pumpkin pieces that had the longer cut out on them together. This is going to be part of our center and I wanted it to be a little thicker so it was sturdy.

I moved on to gluing down my stem to the other middle piece with the small cut out towards the bottom. I slightly curled the leaf at the top to give it some extra shaping.

Then I curled my vines, think of it like a ribbon. I wanted it to be a spiral like the vines coming out of a pumpkin top. If you don't have a bone tool, you can always curl with your finger, a popsicle stick, or run it along the side of your craft table.

Then I glued the other piece on top to cover the places the stem, leaf, and vines were attached. Now your centers can be crossed. In this position I did a line of hot glue down and attached the folded pieces. One in each quadrant.

AND THAT IS IT! A quick DIY Fall Centerpiece in five steps! You can make these in any color, pattern, and almost any size. Don't forget to share with me if you make some paper pumpkins. I love to see your work!


.webp)